Running a Bitcoin Node
Let's run a Bitcoin node!
-
Download, Install, and Run Bitcoin Core!
Some advanced users prefer Bitcoin Knots since it gives them more fine-grained control over node behavior, such as allowing node operators to reject certain types of transactions (for example, very low-fee or "spammy" transactions), apply stricter validation policies, and customize how transactions are relayed through the network.
Since I am writing this article for most people (beginners), that is why I prefer Bitcoin Core. But, if you still prefer Bitcoin Knots over Bitcoin Core, feel free to leave a comment.
-
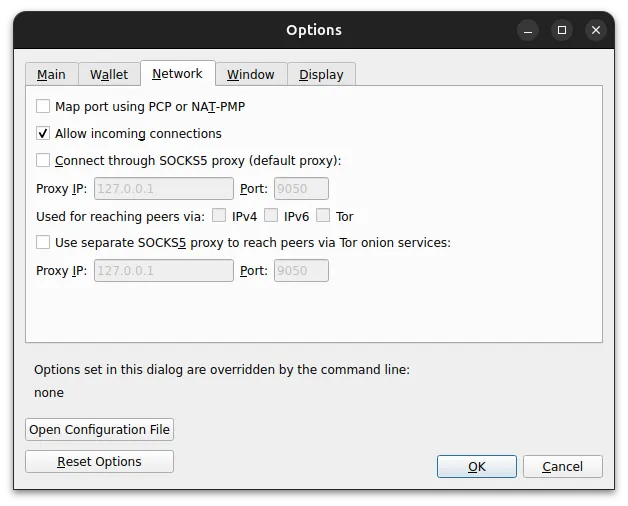
Full or Pruned? At first, the Bitcoin Core will ask you whether you want to run a full or pruned node, not explicitly, but by a configuration. If you want to run a pruned node, the default is already set to
Limit block chain storage to 2 GB. Uncheck it if you want to run a full node. But ensure your storage is at least 1 TB (2 TB is recommended). The current Bitcoin blockchain size when I wrote this article is about 725 GB.One day, if you want to change your pruned block storage or want to go to a full node (in Bitcoin Core), you can go to Settings, then Options. Other configs that you need to ensure are checked are Enable RPC server and Allow incoming connections. The RPC (Remote Procedure Call) server allows other software (like wallets or scripts) to communicate with your Bitcoin node programmatically. "Allow incoming connections" to let other Bitcoin nodes connect to your node, helping the network stay decentralized.

-
Download the Bitcoin blockchain (blocks, transations, and cryptographic proofs)! Yes, the blockchain, not the app or the node, because you already downloaded the node in step 1.
From Genesis, the first block ever created in Bitcoin, mined by Satoshi Nakamoto on January 3, 2009, to today. If it does not keep all the old block files on disk when you run a pruned node. That's why I prefer/suggest running a pruned node. It saved the storage.
Keep your computer open as long as possible! Not in sleep mode or even turned off.
Ta-da! You just ran a Bitcoin node.
Reasons
Why run a Bitcoin node? What are the reasons?
- Verify your own transactions: Running your own Bitcoin node allows you to verify transactions and balances independently without trusting third-party services.
- Improve privacy: When you use your own node, your wallet does not need to query external servers, which helps protect your financial privacy.
- Strengthen the Bitcoin network: Each node helps validate and relay transactions and blocks, making the Bitcoin network more decentralized and resilient.
- Enforce Bitcoin rules: Your node independently verifies that every block and transaction follows Bitcoin’s consensus rules.
- Trustless security: Instead of trusting explorers or wallet providers, your node checks the entire blockchain itself.
- Support decentralization: More independent nodes mean the Bitcoin network becomes harder to censor, attack, or control.
- Run your own infrastructure: Your node can act as a backend for wallets, services, or applications that need reliable blockchain data.
You can ignore the last reason, the infrastructure reason, if you have your own wallet, such as a hardware wallet, or you don't have services or applications that need a Bitcoin node as a back-end.
Maybe you ask, "I just want to keep Bitcoins, why do I need to run a Bitcoin node?" The simplest analogy to answer that question is like operating your own mini bank with monetary sovereignty. Instead of relying on banks, exchanges, or third-party services to tell you your balance or confirm transactions, your node independently verifies the entire Bitcoin blockchain and enforces the network’s rules itself. This means you decide what transactions are valid according to Bitcoin’s consensus rules, not any centralized authority. In this sense, running a node gives you financial self-sovereignty: you hold your own keys, verify your own money, and interact directly with the Bitcoin network without needing to trust intermediaries.
Wallets
I don't want to discuss which wallet products are the best. There are two types of wallets: cold (hardware) and hot (software). The best wallet for serious keepers is a cold (hardware) wallet, of course. Hot wallets are mostly used for development or secondary purposes. If you want to follow this little guide, I hope you already have a cold (hardware) wallet (or prefer one in the future).
If you have a hardware wallet, you know that it has apps to operate it, for doing transactions or viewing a balance. Trezor Suite as an example. Most hardware wallet providers have their own (back-end) servers for their customers. When you use shared servers, your wallet must ask someone else for blockchain data. This reveals your Bitcoin addresses, balance information, and network identity (IP address), which can allow those servers to monitor or track your Bitcoin activity.
Most of those apps give a Tor privacy feature. Tor (The Onion Router) is a privacy network designed to hide your IP address and internet location. Instead of connecting directly to a server, Tor sends your internet traffic through multiple volunteer-operated nodes around the world. Each node only knows the previous and next hop, so no single node can see the full path. Because of this layered routing, your real IP address is hidden from the destination server. Tor hides your network identity (your IP address), but it does not hide the Bitcoin addresses your wallet queries. If you use a shared server, that server can still see your wallet activity even though it may not know exactly who you are.
I didn't say it is not secure to use shared servers. Using shared servers exposes your Bitcoin addresses and transaction activity to third parties. Using a hardware wallet is already secure. A hardware wallet stores your private keys inside a physical device that stays offline most of the time. Because the keys are not exposed to the internet, it is much harder for hackers or malware to steal them. When you want to send Bitcoin, the transaction is created on your computer but signed inside the hardware wallet, so the private keys never leave the device.
Let's get back to our last state. We already run a Bitcoin node. Let's connect our hardware wallet to the Bitcoin node.
To connect our hardware wallet to the Bitcoin node, the most famous tools are Electrum and Sparrow. I prefer Sparrow because I like the UI, and it is easier to install because it has no dependencies. Here is how to connect a hardware wallet to Sparrow. In this example, I used Trezor Safe 3.
- Connect your hardware wallet to your computer (via cable). And enter your hardware wallet PIN.
- Ensure that the Bitcoin node is already running. Or, the Bitcoin Core (or Knots) is already open and has downloaded the latest blockchain / synced.
- Open the Sparrow Wallet.
- Create a new wallet. Click File, then New, or press Ctrl+N. This will create a new Sparrow wallet file with the file extension
.mv.db. If you already have one and want to move it to another computer, you can open your existing Sparrow wallet by File, then Open, or press Ctrl+O. -
A new dialog box popped up. It asks you for a wallet name. You can name it whatever you want. For example,
ari_trezor_safe_3. You can see there is a checkbox for Has existing transactions. You can leave it unchecked if your (hardware) wallet is a brand-new wallet that has never been used. If checked, Sparrow will scan the blockchain history to discover them since the date that you mentioned.
-
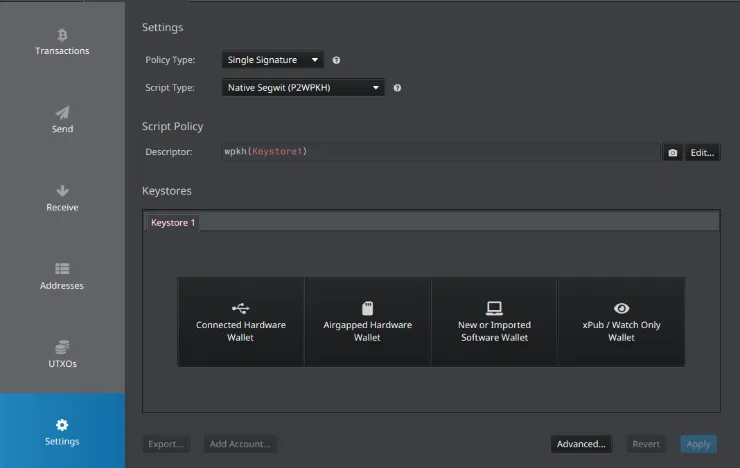
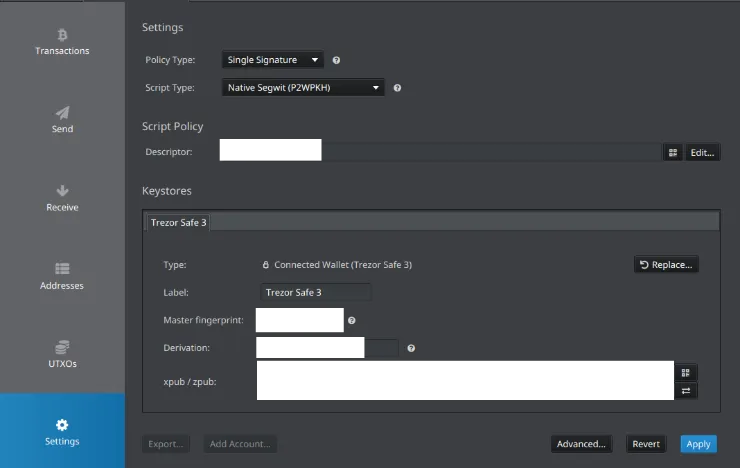
It will show you a Settings panel. Click Connected Hardware Wallet.
-
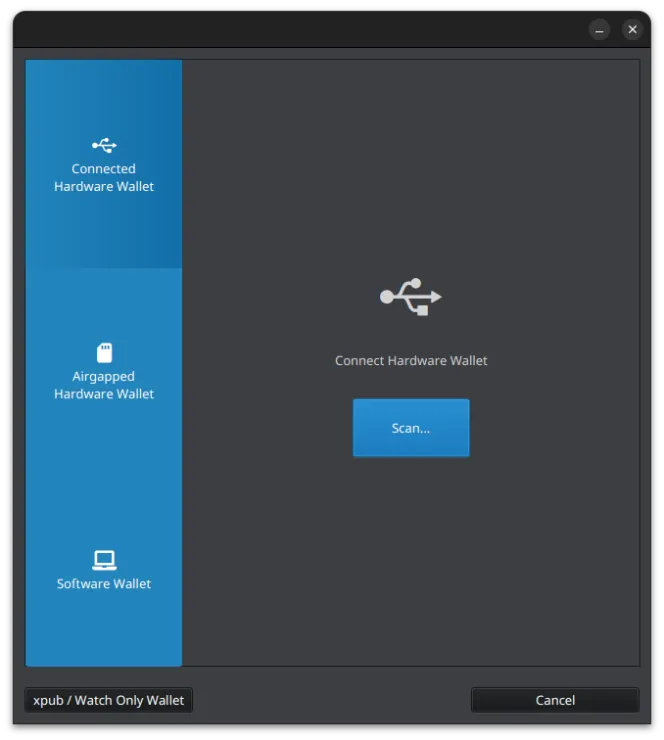
It will show you a new window. On the Connected Hardware Wallet panel, click Scan.
-
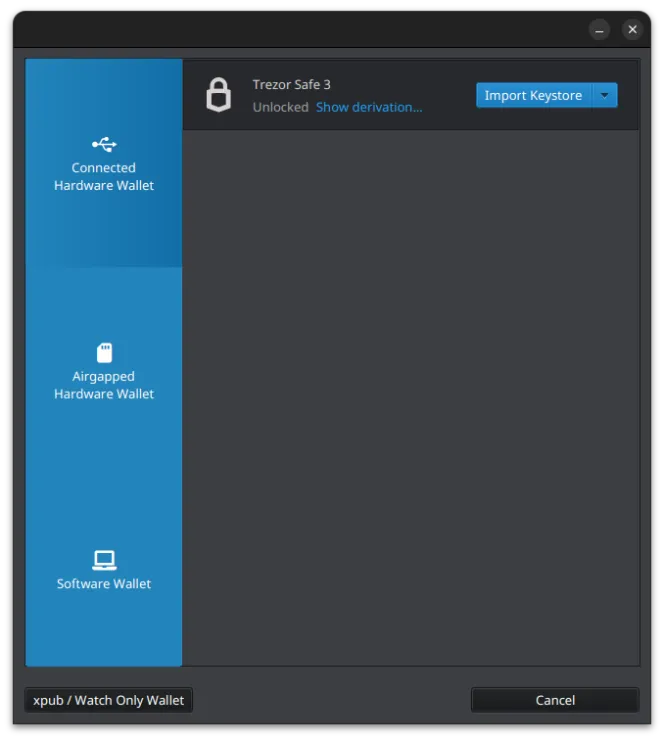
Ensure your hardware wallet is detected, then click Import Keystore.
-
You will be back in the Settings panel. But this time you have a keystore. Click Apply.
-
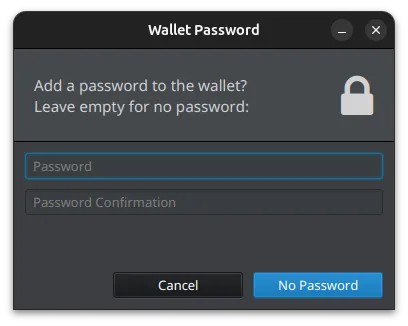
A Wallet Password dialog popped up. It asked you whether you want to put a password on your wallet or not. When Sparrow asks for a wallet password, it is not asking about your Trezor PIN or seed. It is asking do you want to encrypt the Sparrow wallet file stored on your computer? In Sparrow Wallet, the wallet password protects the stored wallet file on disk; it doesn't protect your private keys (they remain in your hardware wallet). So the password in Sparrow is about privacy and local file protection, not key security. No Password is acceptable if full disk encryption is enabled (Linux usually does this) or you are the only user on your computer. What happens if someone steals your Sparrow wallet file? They could see your transaction history, addresses, and balances. But they still cannot spend your Bitcoin, access private keys, or sign transactions without your hardware wallet and PIN.
- Now, you are ready to go. Enjoy doing Bitcoin transactions without having a public/shared node.
Frequently Asked Questions
- Most hardware wallets have official apps for managing them. Are those apps now useless, since the Electrum/Sparrow wallet can replace them? Not really. We still need them to update our hardware wallet's firmware.
- I want to buy Bitcoins. How? You can buy Bitcoins from any reputable cryptocurrency exchange. From there, send your Bitcoins to your (hardware) wallet via Electrum/Sparrow wallet, Receive panel. There is your Bitcoin address to receive.
- We can only make Bitcoin transactions via desktop, not mobile, right? Yes. This article showed how to run a Bitcoin node on your personal computer, not always running 24/7, and then connect the running Bitcoin node on your local computer to your wallet. This way, you can only view balances on your mobile device via the official hardware wallet apps.
This article provides basic information about running a Bitcoin node, why you should run one, and how to connect your local Bitcoin node to your wallet. Please leave a comment if I missed something. Please share this article if you found it helpful.
I might write another article covering more advanced methods for running a Bitcoin node and connecting it to a mobile phone in the future. This way, we can make Bitcoin transactions from our mobile phones, using our own nodes.